Reclaimed Wood Shelves

The pretty bathroom that we added onto my daughter’s house a couple of years ago has been finished for sometime, with the exception of some reclaimed wood shelves she had always wanted to add.  We spent some time researching reclaimed wood, drove to a salvage business in downtown Los Angeles, and found what might be a good fit.  Then, as other projects moved forward, the salvaged shelves were put on hold.  

Finally, the wood was purchased, and the shelves were added to the area above the commode.  My daughter wanted this rustic look to relate to the natural weave of her laundry basket and to add some relief to the fancy turned legs of the reclaimed dining room buffet we made into her vanity with the addition of a vessel sink.   The beautiful faucet set and vanity, along with the custom tile band for the shower, are the show stoppers in the bathroom.

The ceilings are tall in her 1930s Spanish home, and my daughter felt the commode area needed a little special attention.  She added the stenciling on the commode wall for a little sparkle, which adds to the elegance of the rest of the bathroom; the rustic shelves are a juxtaposition to this design element.

Dressing the shelves was the next project.   We found a fun little wire basket at the “Junk Bonanza” in Del Mar a couple of weeks ago in which she could store her spare bath towel.  Then she added some of her favorite things from trips abroad and down under.  The memorabilia are a nice reminder of fun trips and outings with friends and family.

Additionally, we picked up some fun pieces during our salvaging outings.  We picked up vessels for planting succulents on the patio along with an old bedspring she will use as a planting screen for added privacy behind her outdoor patio furniture.  I will share more about these and other items in another article, so stay tuned for more of our salvaging exploits.

Semi-Custom-Made Blinds

Finding suitable window treatments for my living room was a concern for me.  I wanted something that would give us a little privacy at night, and disappear during the day, but be attractive all the time.  When I did my first design project back in the 60s, I got high marks for using matchstick blinds, and trimming them with decorative fabric trim tape.  During that period, there was a bit of a Bohemian vibe, and matchstick blinds were easy to acquire, hang and decorate, not to mention inexpensive, too.

I have continued to use matchstick blinds throughout the years, sometimes sacrificing most of the blind to make simple valances— where full coverage of the windows was not necessary— but still giving the impression of window treatments.

In the early days, I did not use liners with the blinds; they were not in an area that required privacy.  In my previous office that faced east, cutting the bright morning sunlight and heat made lining a must.  Once the sun rose above the blind area of my view, I could easily raise the blind and enjoy the view.  

My current living room faces the street, and I felt too exposed to do without any window treatments.  I had considered a lightweight wool drape for the window; but with an east facing window, I felt it would require a lining, which would make the drape too heavy to fall nicely and would add considerably to the already expensive wool fabric.  Besides, wool would be more formal than I wanted.

Matchstick blinds were a little harder to find this time around.  Once I got the requisite sizes, color and number I needed, it would be up to my handy husband to cut them to size—standard was not going to work in my space.  The cutting down of the blinds would be put off for sometime, since it required the use of his table saw, which had not found a place to operate right away.  Bummer!

The trick to cutting down matchstick blinds, is to roll them tightly and use a new, fine tooth, sharp blade.  In days gone by, he used painters tape to hold the blind while he cut it to size, but this time he thought of using hose clamps.  Brilliant.

Once the blinds were cut and fixed to the windows, I was delighted with them.  I wanted to live with them for a little while to see how I felt at night with lights on inside the house—still a bit exposed. 

The solution was to line them.  Again, there was nothing standard about the now customized blinds.  I bought some light-weight batiste fabric, trimmed it to size and hemmed all four sides.  Perfect.  Now to attach.  I began doing it by hand, but quickly decided that hand work would be too labor intensive; and my hands and back would not appreciate it.  I thought of using a nylon tag gun that is used to attach price tags to clothing, but would employ shorter nylon pins.  Fabric stores carry these guns.  They are called Quilter’s Basting Guns; however, I found that the nylon pins were red or hot pink, and that would not do for my project.  I went on-line and found the basting tool with shorter, clear pins; but had to wait for them to be delivered—over a holiday weekend.  

Once I had the basting tool, I was in business; and it worked like a charm!  I was particular about getting the lining up as high as possible and tacking it all along the top as well as the bottom.  Additionally, I pinned all the way down the liner and across the blind in neat rows, to ensure the liner would roll up cleanly; and from the outside it would appear smooth.

The end result is just what I wanted: the privacy issue is solved, and it feels cozy from the inside at night.  During the day, with the blinds raised, I love the light and the look of the blinds rolled up; it adds to our casual lifestyle, not so Bohemian since the blinds are unadorned.

From Dark to Bright and Light

Spooky Beginnings

Spooky Beginnings

The china cabinet I have been working on for what seems like months is finally finished.  The reason it took so long is that I had to paint it on site, which required finding accommodating times for both my client and me.  If I can work on a piece at home, I can work on it anytime.  Painting a cabinet requires many steps: washing away oils and grease, priming, two coats of paint and finally playing the antique glaze.  I took all the hardware off and painted it a warm brown to blend with the counter top.

That Awkward In Between Stage

That Awkward In Between Stage

My client is so pleased and happy I suggested painting it to give it a lighter, brighter feeling.  The cabinet shares space with the kitchen and the TV room.  While the kitchen has white cabinets, the TV room has lots of darker furniture, fortunately blue is a reoccurring color in this clients home.

Painting the cabinet has given it a visual lift and shows off the pretty items my client has to display.  I left the top surface of the bottom cabinet (the counter) its natural wood color as I did the crown molding.  I felt that the wood would wear best, since my client would use the counter area for serving; and a painted surface is not always the most durable surface.  The rest of the cabinet would show best with the white paint and an antique glaze.  There are carved details that now show up subtly without being too bright.  The combination of the original natural wood color marries nicely the darker wood tones in the TV room and the white kitchen cabinets do not feel quite as foreign now with the antique glazed cabinet.

For a cohesive look,I painted the interior of the upper cabinet the same blue that we have used in other areas of the home.  The rug in the family/TV room has the same blue in it as does several upholstered pieces.

While the style of the cabinet is in the same French Country style as much of the home, the TV room has a more comfortable lounge sofa and reclining chair.   The china cabinet is a nice fusion of the two, in style and color.  There is no jarring feeling when you look from one room to another.  Before, the dark cabinet seemed too heavy for the space and oddly out of place; now there is a nice blend of old and new.

Ready For Its Close-up

Ready For Its Close-up

With the kitchen cabinets so white, my client worried that the “off white” of the paint-glaze combination would look out of place.  Once it was finished, she was pleased with the blend of the two.  Clearly the china cabinet is a more old fashioned style piece than the more modern shaker style kitchen cabinets, but together they work well.  A shaker style cabinet lends itself nicely to many different styles, hence its popularity today.  

Message Boards

There are message boards of every size, shape, color and material, but here are a few ideas you can make yourself— probably out of materials you have around the house.

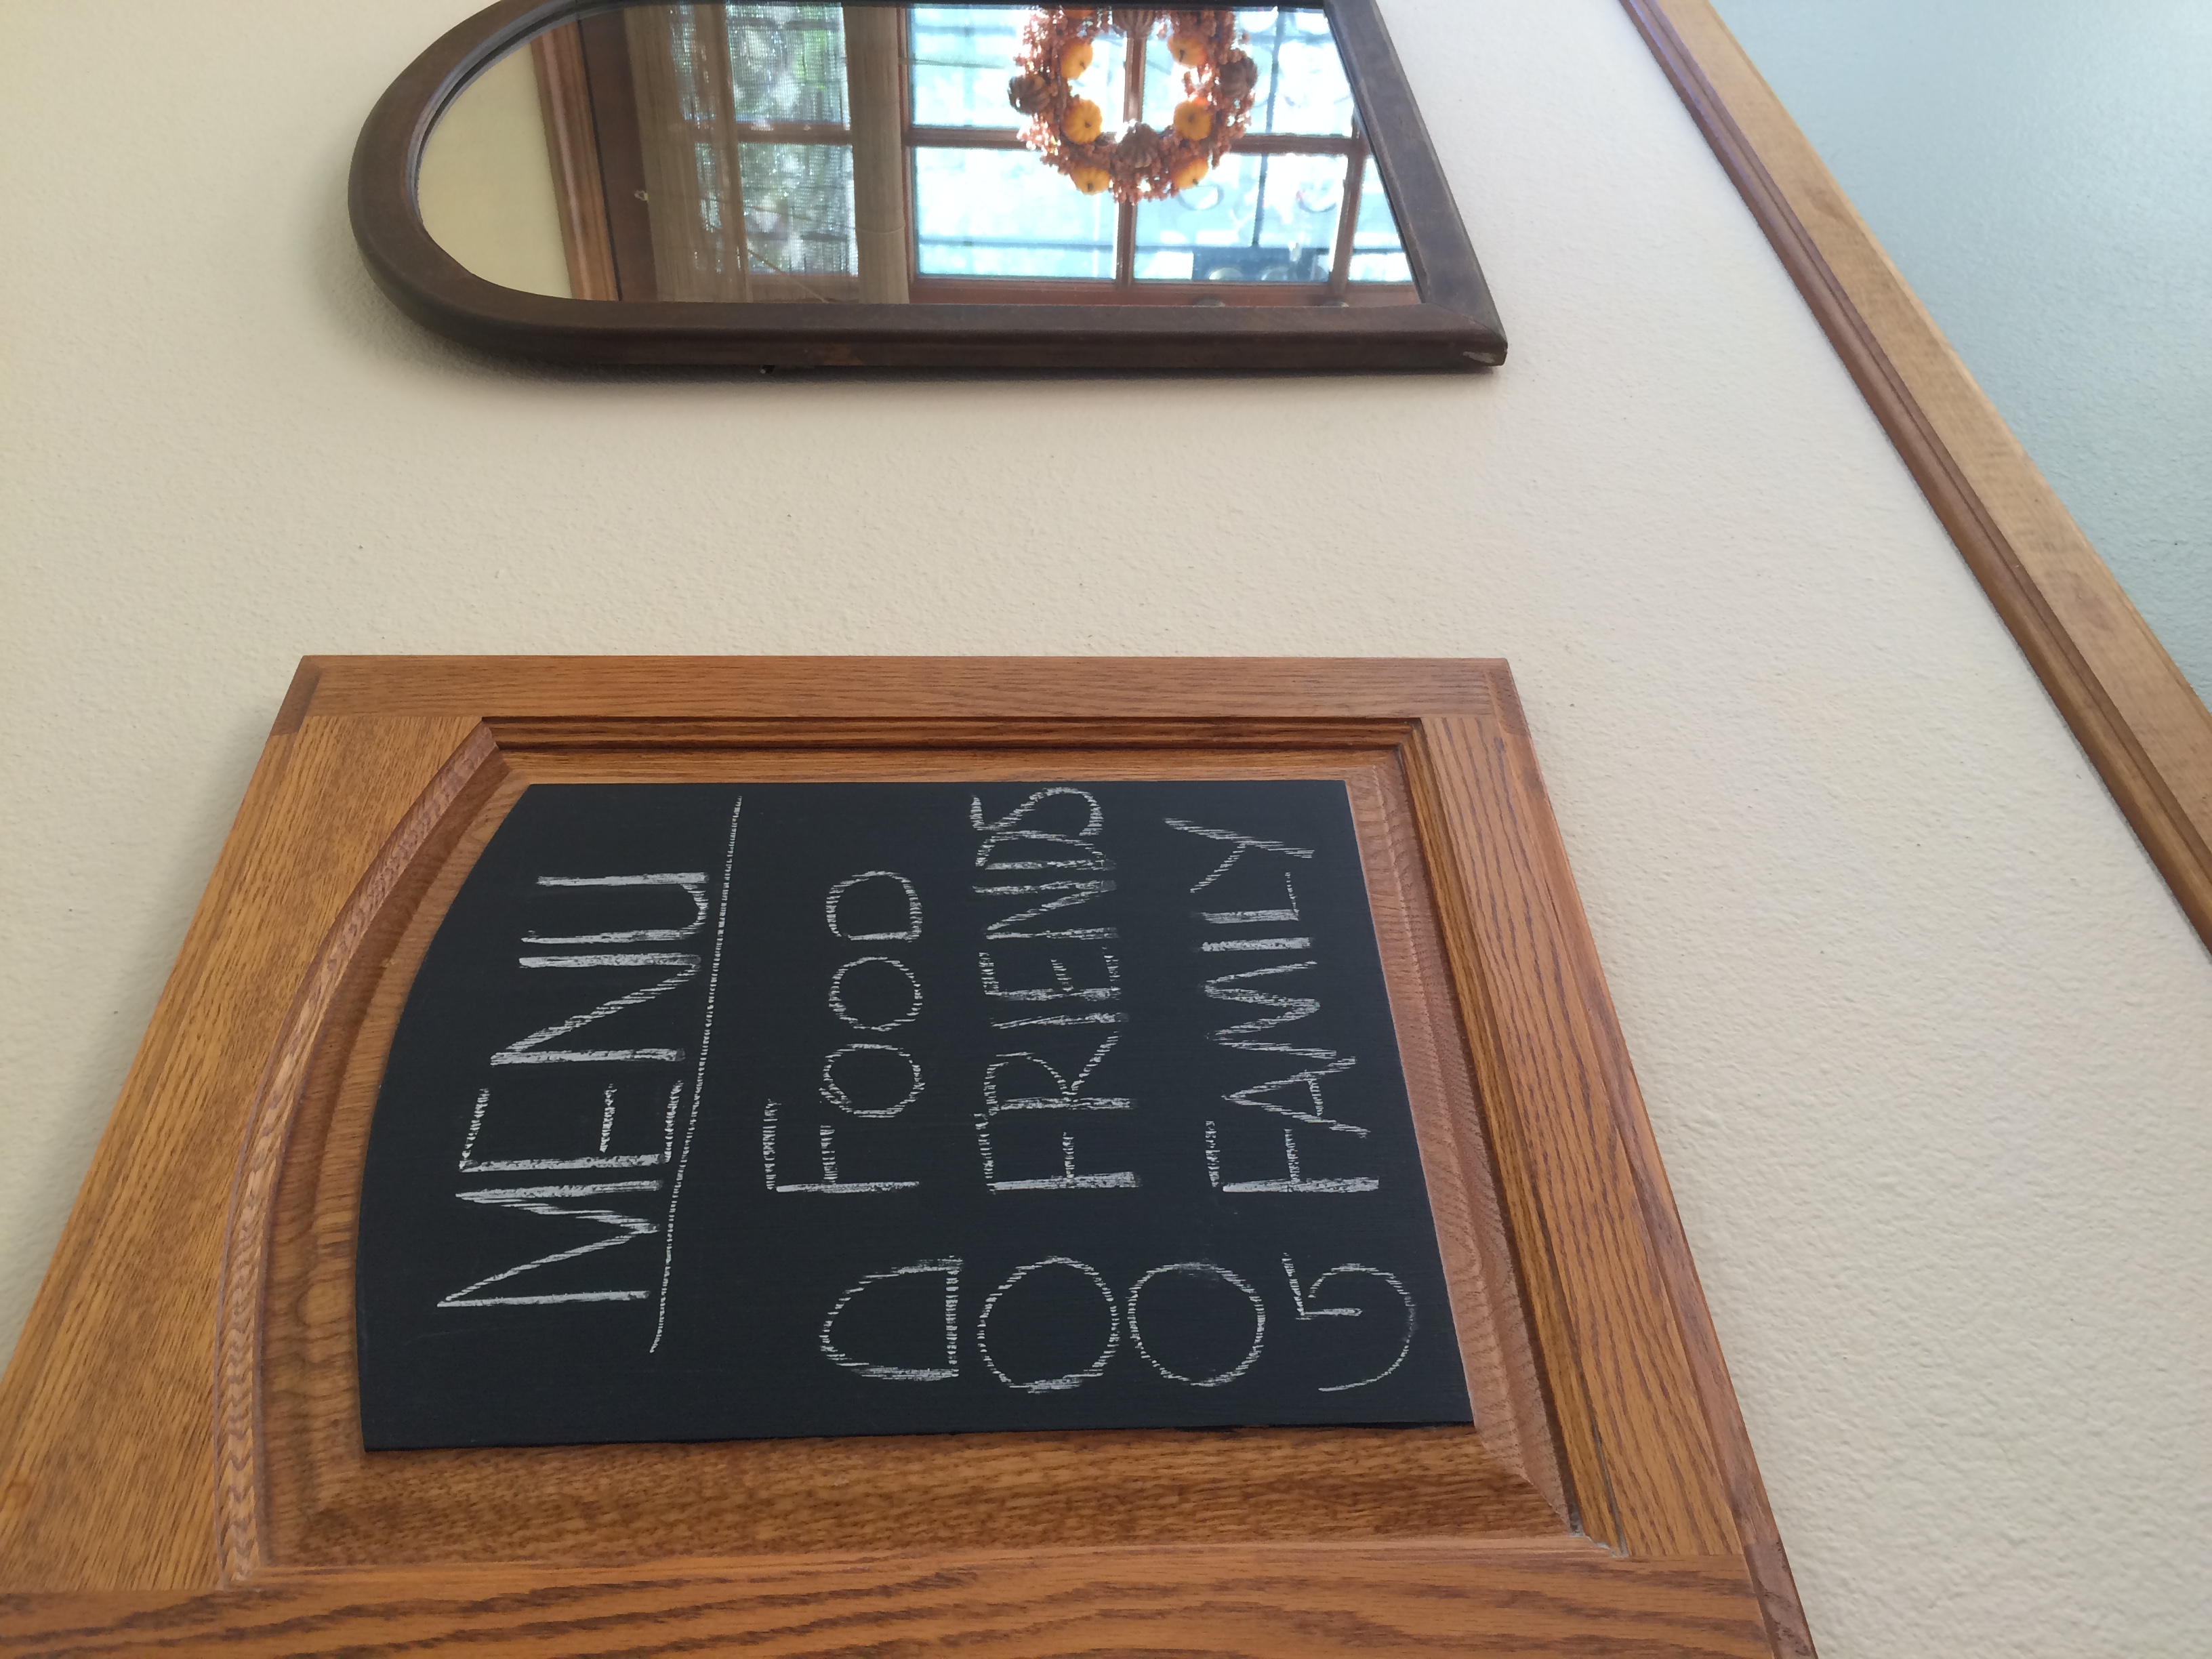
Several years ago, my husband and I did a modest remodel of our kitchen. We took down the over-the-island cabinets and found another home for them; I love recycling! Next was the kitchen island itself; made of solid oak, it was hard for me to simply put its parts into the dumpster. I did have to retrieve some as my handy hubby was quick to toss them. I made a message board from one of the doors by simply painting the inside panel with chalkboard paint— that was the simplest thing ever. As a postscript, we have used nearly every piece of that oak island for a variety of projects, including a sample door for paint colors to my clients what painted oak might look like; it has been a huge success.

You could use this idea on a cabinet door that is currently in your kitchen, as long as it is within easy reach and convenient to change as needed. Another idea would be to paint a window pane or two on a window that is facing a less than attractive view, with chalkboard paint, again as long as it was within easy reach.

My next idea is to use an old picture frame with glass. I gave one away recently, then I had this idea; it figures! I went to Goodwill and spent $4.99 on a frame measuring 16X20 inches. Next I painted the frame, I used black as it is the easiest to use in my kitchen. I put the glass on a piece of grid paper and wrote out Santa’s List, Naughty and Nice and then some names (fictitious of course). I used dry erase pens, but you could use any kind of marker that will stick to glass and easily wipe off. Rubbing alcohol works well to remove markers.  

This message board is further made interesting by placing some left over Anagluypta or embossed wallpaper, to give the board some texture. You could use any type of wallpaper, wrapping paper, or rice paper that you might have on hand. Of course, you could find a backing paper that suite the room in which you wish to use your message board, e.g., children’s bedroom, playroom, or home office. My suggestion would be to use a pale-colored design to avoid competing with your messages. Any color will work as long as it is pale. You can find great paper choices at stationary stores, art stores and of course on line.

Once you have completed your board, find an appropriate place to hang or lean it up against a wall. The nice thing about using a glass surface is that it is easily changed with the season, or just a fun place to doodle for small children while you are busy in your kitchen or office.

 
Santa's List

Santa's List

 
Chalk Painted Cabinet Door

Chalk Painted Cabinet Door

The Senses and Design


We are fortunate when we can enjoy a combination of positive effects on several of our senses at the same time. In the world of design, our senses of sight and touch offer pleasures, but our sense of smell is a likely third; it is oh so satisfying when flowers and greenery produce color, scent and texture all at once.

Bringing the outdoors in is a goal for most of us living in a temperate climate. While I am not a landscaper, I do know what I love to see and smell and Salvia Clevelandi, Winifred Gilman is a favorite for my eyes. I love it in the garden near an open window or door, so I can take in its lovely scent whenever a breeze comes up.

I like to make good use of plants in decor by using the real thing, whenever possible. Even dried plants can give off a pleasant fragrance in dried arrangements, or tied in a bundle and hung in a closet or shower. I like to use eucalyptus branches in these areas as well, especially hung in a shower; the steamy atmosphere helps bring their sweet, fresh scent into the surrounding areas-- for me, truly heaven sent.

Even a particularly lovely piece of furniture that needs protection from water spillage can be enhanced with a dry arrangement of local native or succulents as a centerpiece. One should never water a succulent on a table top; it should always be watered sparingly and on a surface that can be easily wiped up. Once the water has settled in the container, there is no danger of leaching moisture onto the surface of the furniture. An arrangement can sit for quite a long time, and infrequent watering will make a happy situation for both plant and table top.

Lavender is another favorite, both in the garden and in the house. These plants do well in our dry climate and are a favorite to dry and use as a sachet for drawers. Let me mention rosemary as well, which adds another sense, the sense of taste. Rosemary’s flavor adds to many savory dishes. Growing theses plants makes it easy enough to snip off small branches to bring into the house frequently, to add to an arrangement of roses or to use all by themselves. 

One of the great characteristics of these plants is their structure. They offer so many opportunities to display them creatively. They look lovely against a plain wall, or one enjoy the shadows they cast in the evenings. In addition, they bring fragrance to the room and the soul. With their color, scent, texture and taste, they have the makings of a long lasting and beautiful arrangement.

 
IMG_2145.JPG
 

Sleepy Bear Cabinet Grows Up


Over the decades, useful and once treasured furniture pieces often get pushed aside for newer pieces, much like toys in the toy box. These pieces are associated with fond memories, and those memories make them hard to easily cast off; so we often find space for them in a garage or attic. The furniture piece in a garage can hold all sorts of things and so becomes useful, but mostly forgotten, in its new home. Small houses are always in want of more storage, and re-thinking the possibilities for an old piece of furniture can yield a better use for rediscovered items.  

Here is where this story begins--again. The cabinet lived in the garage, gathering dust, while storing gardening tools, seed packets, and a few moving blankets, along with some outdoor decor items. Adding more square footage to a master bedroom afforded more wall space to accommodate the cabinet inside to store more grown up things than when both the girl and the cabinet were young. Gone are the onesies, diapers, shirts and shorts and a few little dresses and caps; now the cabinet stores travel supplies and extra bathroom supplies; and a few shelves added will once again store shirts and shorts and possibly a sun cap or two.

The cabinet needed a good cleaning. Then We removed the screws that held the massive handles, meant for small, chubby hands. We filled the holes with a wood filler so we could select more modern drawer pulls without having to match the spacing of the old holes. We lightly sanded the piece, then primed and painted it a neutral color. We found fun drawer pulls at Anthropology, for a more sophisticated look.

The harder decision was what to do with the fuzzy, sleepy bear decal on the cabinet. At first, we thought we could cut out the panel and insert a glass panel with either a sanded glass or another decorative style of glass. The problem was that whatever is stored inside will show to some degree through the glass. Next, we remembered antiquing old mirrors long ago, and thought that might be a good solution, to reflect some light, while obscuring the contents of the cabinet; however today’s mirrors are constructed of better grades of silver or reflective material than days of old; today’s mirrors do not degrade nearly as easily as they used to, so we scrapped that plan. Next, we used some Anaglypta or embossed wallpaper, which is paintable and adds texture and interest to an otherwise pretty plain surface. This type of wall covering was first used in Victorian homes by inventor Fredric Walton, who patented linoleum floor covering in 1860.

Today’s embossed wall coverings are much softer and easier to work with and will not harden nearly as hard as they used to in olden days. Once we cut the piece and glued in place, it was painted a light gray paint and added a silver glaze to achieve an antique look.

Now the piece has an entirely new and fresh look and will serve for many decades to come. Happy memories now live inside while serving a modern girl with modern needs.

 
Sleepy Bear Before 

Sleepy Bear Before


Sleepy Bear All Grown Up

Sleepy Bear All Grown Up

Easter Egg Garden

When I was a child, the markets sold cottage cheese in cartons decorated for Easter, and my family bought the cheese in these cartons.  We eagerly consumed the cheese  so we could use the cartons for little Easter Baskets to play with until the big day and the fancy baskets arrived Easter morning.  We would fill them with cotton and sprinkle bird seed on top and water them; soon we had our own little grass gardens in which the Easter Bunny left a brightly colored egg.  

On a smaller scale, we would take an egg shell and press cotton balls into the largest half, again sprinkle either bird seed or grass seed in the cotton soil and water it.  We would tend our egg gardens daily and report the progress of the seeds that would sprout.  It was a fascinating lesson for us as small children to be able to watch germination on a daily basis.

There is still time to begin a small garden of grass before Easter, if you start right away.  Naturally, you can use any small basket or vessel that is water tight, fill it with soil or cotton and sprinkle either grass seed or bird seed on top and water.  There is no need to bury the seeds; they will sprout sitting on top of the cotton or soil.  Place the egg or basket garden near a window and keep the soil moist; then watch the seeds grow before your eyes.  Once you have a healthy egg or basket of greens, you can add them to your centerpiece along with some decorated eggs or candy eggs. 

You also can place each half of an egg shell garden into an egg cup and place one at each setting on your holiday table as a party favor.  Add a toothpick with a small card along with each guest’s name, and you will have a clever place card sitting in a field of greens.  An entire centerpiece could be fashioned from eggs, grasses, baskets and your imagination.  A few spring candles added to the mix will help illuminate your table.

What I love about this tradition is how simple it is and how it helps connect children to the growing process, albeit in its most simple form.  It is also one of the least messy projects you can do with very young children.  Who knows, it may inspire little gardeners; and you will benefit from their enthusiasm for years to come.

Easter Egg Garden.jpeg

Make a Eucalyptus Tree for the Winter Season

Every year, I see so many clever and creative Christmas decor ideas that embrace traditional styles as well as traditional with a twist.  While I love new ideas in the world of decor, I am traditional at heart.  Here is a tutorial on a completely original design I created more than 30 years ago: a lighted tree with natural eucalyptus leaves, and topped with your favorite tiny tree topper.

While this is on the easy, it is tough on your fingers, so you may want to use a thimble.  

You will need:  

Styrofoam cone (white or green)

Short string of 25-50 small electric lights (white or green wires)

Hair pins, not bobbie pins ( find them in beauty supply shops)

Eucalyptus branches

Thimble

Scissors or garden clippers

Small beads, either multi-colored, red or white or natural seeds from your garden

Tree topper, a small bird, angel, bow, or star, whatever you wish.

First, open your short (25) string of lights and begin winding at the bottom of the cone, securing them with the hair pins.  Continue winding them fairly close together until you reach the top of your cone, leaving one light near the top of your tree.  You should have a length of cord at the bottom to plug into an electric outlet when you are finished.  It is always a good idea to test the string of lights to make sure they are in working order.

Once your lights are secure, begin cutting (using garden clippers or strong scissors) the eucalyptus branches into short stems; I use the two leaves on opposite sides of the stem securing the stem by pushing a hairpin into the cone.  You can use a glue gun instead of hair pins.  Use the larger leaves on the bottom of the cone and gradually smaller ones the smaller ones as you go up the cone to the top of your tree.

This is a fairly long process, and this is where you may want to have a thimble to help push the pins into the cone.  As you get near the top of the cone, the pins will be too long to go straight in, so angle them downward, so they don’t stick out of the sides of the cone.  You will soon see how the leaves fit around the lights, covering the cords and filling in the cone.  You will want the leaves to be close together for a full look.

Once you are satisfied with the density of the tree, you may begin using your beads, pods or tiny decorations to adorn the tree; this is a very subjective process, so place them as you wish, again using the hairpins.

Your tree topper is the last piece to add, so use your hairpin to secure it.  Find a table top, or corner for your lighted creation and enjoy the fruits of your labor and the season.

This tree creation can be a winter fixture, by using natural seeds or just white beads, or red, like you see in nature.  I keep mine up through January, or throughout winter to brighten the gloomy days of winter.


The Search Continues


The build-out for my current client is not limited to a new bathroom, but also a seven- foot extension of the master bedroom.  Having the additional space in the bedroom allows for a cabinet on the other side of the bed for some much needed storage and surface space.

The need for this furniture piece took us back to the Rose Bowl in search of a hefty bedside cabinet.  Not wanting a matched pair made the search both easy and more difficult as sellers are less likely to break up a set; although it is always a good idea to ask, you might get lucky.

This time we planned to paint the surface so we were less concerned with the species of wood and its condition.  I am always surprised to see “shabby chic” still popular, but it does not alter our goal for a painted surface.  

IMG_1720.JPG

The piece we settled on had some pretty feminine applique details that I mistakenly thought would be simple to pry off with a putty knife.  Apparently, a century ago, the glues they used were pretty strong; in addition,  the appliques were secured with tiny brass pins.  We needed to resort to heavier tools than we found in the pink tool box; we needed a man’s tools for this job!  The appliques came off but not always cleanly; some of the oak splintered off leaving more to sand off with an electric sander.

My client chose this piece  because of its size and storage capabilities and because of the secret compartment!  When making choices from flea markets, one needs to be certain the piece will fit the space and needs; it is wise to be careful, and always carry a tape measure since such pieces are not returnable.  Getting the furniture from the stall to one’s vehicle is the task of the buyer.  We were not well prepared for this part; the oak was much heavier than we anticipated, and we were without a strong guy to carry the for us.

We struggled carrying the awkward piece through the crowds, having to stop and rest periodically.  At one point, we had the great good fortune to stop in front of a stall where the kind owner offered to loan us her homemade dolly if we would leave a driver license.  She apologized for needing to keep something of value as she had been burned by people in the past not respecting her generosity.  My eternal thanks to this wonderfully kind woman.

To make a simple portable dolly requires on a couple of 2x4’s nailed to form a platform and covered with a remnant piece of carpet.  Four heavy duty casters attached with some screws to the underside, and one is in business. 

All Season Outdoor Lighting

IMG_0813.JPG

One of Southern California’s best assets is the weather, allowing homeowners to enjoy many months of outdoor living.  Add an outdoor fire pit, and you can have smores nearly all year long.  While lighting is an essential necessity inside, it is an added benefit outside to increase the ambience of your outdoor space.

Having mood lighting installed is often an expensive endeavor, especially if you have a large area to cover;  but you can select a small social area and create your own lighting, if only around a small fire pit with some comfortable seating.

If you have an established patio area with covering, you are nine-tenths of the way there already.  All you need is a little mood lighting to finish the space.  A pergola can be fitted with a simple string of clear lights.   If set on a dimmer, they are especially useful for different activities; board games require more light than enjoying a glass of wine on a summer’s eve.  

Add some pendant lighting above a table, and you can add additional light and opportunities for capturing the right mood.  The example I have here is one that you can make on your own with a little skill and some caution while handling the sharp edges of the pressed metal.

Sheets of pressed metal can be easily obtained at your local home center, and you will find a variety of patterns from which to choose.  Again, I caution you to wear gloves when you are handling at these sheets as they are extremely sharp and cut like a knife with unless your hands are protected.

It is best to have a professional install an exterior socket unless you are experienced in working with electricity.  Once the electrical box is in place, it is fairly simple for a homeowner to purchase a pendant kit from the home center and hang them from the roof or ceiling of your pergola.

IMG_0809 copy.JPG

Creating a metal shade requires cutting the metal sheets with an angle grinder or similar tool.  A rigid, 90-degree edge is necessary for the shade.  We created a shade using a piece of one-eighth inch thick, right-angle aluminum stock as a bending edge and anchoring it on the edge of a workbench with clamps. to form a sharp angle for the edges of the shade.  Then we gently hammered the material into a right angle bend.  Next, we determined the size of the shade.  We used three different sizes for aesthetic reasons.  Once you have formed three of the bends, we brought the two remaining edges together and clamped them.  We applied epoxy glue to  hold the edges together.  For the top where the socket goes, we used the metal frame from an off-the-shelf paper lantern from IKEA.  We discarded the paper part of the lantern and simply epoxied the metal shade to the lamp frame.  We used one-hour epoxy, and the shades have been in service outside for more than a year, with no problems.

Hanging or pendant lighting can be an asset outside in many places.  Think of highlighting an area under a tree--which might require some clever electrical work, and add a bench for seating.   A lantern overhead in an arched trellis at an entry to a garden would be particularly inviting to guests arriving or leaving your home.

All you need to do is take a walk around your property and see where you could imagine having a special seating area and add some light.